Inspectioneering
Inspectioneering Journal

Detection of Defects and Corrosion Under Pipe Supports and Inaccessible Areas Using EMAT Medium Range UT Techniques

By Borja Lopez, President and CEO at Innerspec Technologies, Inc. This article appears in the May/June 2016 issue of Inspectioneering Journal.
8 Likes

Introduction

Corrosion and cracking present problems for every industry that relies on pipelines to transport liquid and gas products. There are many different kinds of techniques and equipment used for examining pipelines. These vary based on specific needs, access restrictions, and environmental conditions. In the last few years, electromagnetic acoustic transducer (EMAT) has come to prominence for its ability to quickly scan exposed pipelines for corrosion, cracks, and other defects using medium-range guided waves and without the requirement for liquid couplants.

Recent sensor and technique developments have now enhanced these capabilities to reliably inspect inaccessible or difficult to access areas for corrosion, such as the undersides of pipe supports and pipes with heavy coatings.

Axial and Circumferential Scanning with MRUT

Long range ultrasonic testing (LRUT) uses encircling rings to generate guided waves that can detect moderate defects over long distances on relatively clean pipes. One of the main disadvantages of this technique is that it has an uninspectable dead zone of approximately 1-2 meters in front of the transducer, which makes it inappropriate for small distances and where valves, connections, or other components are present.

EMAT-generated medium range ultrasonic testing (MRUT) lamb waves have been used for axial scanning using attenuation techniques for several years. This technique permits fast scanning of exposed pipe with great detection capabilities. However, its use in reflection mode (circumferential scanning) for inspecting inaccessible areas has been limited because lamb waves can leak into coatings and supports, which restricts its practical use in the field.
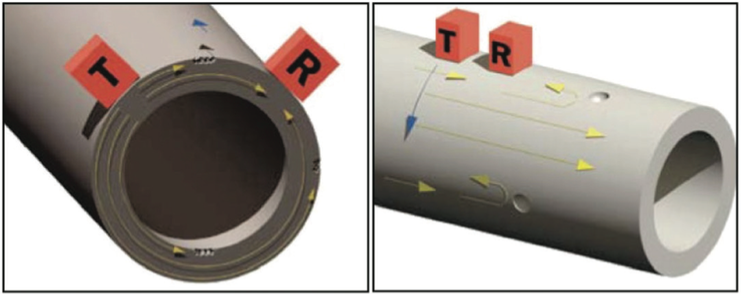
Figure 1. Circumferential scanning using attenuation vs. Axial scanning using reflection.

This content is available to registered users and subscribers

Register today to unlock this article for free.

Create your free account and get access to:

  • Unlock one premium article of your choosing per month
  • Exclusive online content, videos, and downloads
  • Insightful and actionable webinars
GET STARTED
Interested in unlimited access? VIEW OUR SUBSCRIPTION OPTIONS

Current subscribers and registered users can log in now.


Comments and Discussion

There are no comments yet.

Add a Comment

Please log in or register to participate in comments and discussions.


Inspectioneering Journal

Explore over 20 years of articles written by our team of subject matter experts.

Company Directory

Find relevant products, services, and technologies.

Training Solutions

Improve your skills in key mechanical integrity subjects.

Case Studies

Learn from the experience of others in the industry.

Integripedia

Inspectioneering's index of mechanical integrity topics – built by you.

Industry News

Stay up-to-date with the latest inspection and asset integrity management news.

Blog

Read short articles and insights authored by industry experts.

Expert Interviews

Inspectioneering's archive of interviews with industry subject matter experts.

Event Calendar

Find upcoming conferences, training sessions, online events, and more.

Downloads

Downloadable eBooks, Asset Intelligence Reports, checklists, white papers, and more.

Videos & Webinars

Watch educational and informative videos directly related to your profession.

Acronyms

Commonly used asset integrity management and inspection acronyms.