| This article is part 1 of a 2-part series. |
| Part 1 | Part 2 |
Having the ability to substantially extend tube life in Steam Reformers is essential in maximizing use of capital investments in Methanol, Hydrogen, and Ammonia plants. With the price of nickel at an all time high, the cost of installing a single reformer tube can be upwards of $20,000 USD. However, in today’s highly competitive markets the effect of the unplanned downtime in reducing the plant on-stream factor is far greater than the installed cost of a single reformer tube.
The plant engineers need to have data which will allow them to better manage the reformer tubes and where circumstances allow them to safely extend the tube life expectancy beyond the typical 100,000 operating hours, as generally defined by their creep-based design by furnace designers [1].
Over the last 6 years over 100 plants around the world have applied the Laser-Optic Tube Inspection System LOTISTM “internal” laser-based reformer tube testing technique to obtain invaluable tube creep information as it relates to tube damage in the early stages as well as allowing the determination of when a tube should be retired from service.
Internal Laser-Based Examination Method
This examination process collects millions of data points from the internal surface of the reformer tube which can be modelled to provide powerful visual aids necessary to make operational, mechanical, or design changes to increase the efficiency and performance of a steam reformer.
The internal inspection is carried out quickly during a turn around when the reformer catalyst is being changed and takes less than 3 minutes per tube. Access is only required from the top of the tubes where the catalyst is discharged/ loaded and no access to
the reformer box itself is necessary.
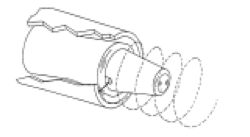
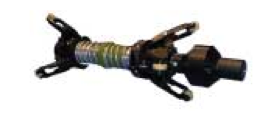
The equipment utilized for this examination consists of the compact laser-based system in conjunction with the appropriate laser mapping probe (Figure 1). This laser-based surface mapping system is based on the principle of laser optical triangulation.The probe projects a small laser beam (typically 0.5mm in diameter) onto the target surface. This provides precise radius measurements to 0.05mm of the inside surface of the tube at each sample point, which for a typical 100mm ID tube means creep strain is quantified to within 0.05%.
The laser source, optics, and photo detector are housed in the forward section of the probe. The optics housing rotates at 1,800 rpm and is drawn through the tube so that a helical sampling pattern is generated.


Comments and Discussion
There are no comments yet.
Add a Comment
Please log in or register to participate in comments and discussions.